16. December 2025
How to Install Solar Panels at Home: A Complete DIY Guide for Beginners
The advantages of solar energy are undeniable: it’s a renewable, cost-effective, and environmentally friendly way to reduce your carbon footprint and save significantly on electricity bills. Installing solar panels might seem daunting, but modern DIY kits make it simple and doable for homeowners. However, if you’re uncertain about any part of the process or dealing with complex electrical work, it’s always best to call a professional to ensure safety and compliance. This comprehensive guide will walk you through everything you need to know about installing solar panels at home, from understanding how solar energy systems work to selecting the right components and carrying out the installation safely and efficiently.
Understanding Solar Energy Systems
Before installing your solar panels, take a moment to understand the two main system types: on-grid and off-grid. Learning how they work will help you pick the best option for your home’s energy needs:
On-Grid Solar Systems: Connects your home directly to the local electricity grid. This setup allows you to use solar power during the day and automatically draw electricity from the grid when sunlight is unavailable, such as at night or during cloudy weather. In some countries or regions, one of the biggest advantages of solar energy is the ability to send excess power back to the grid and earn credits from the utility company, a process known as net metering.
Off-Grid Solar Systems: Also called a standalone system, it operates entirely independently of the utility grid. It uses a bank of batteries to store excess solar energy, ensuring electricity is available at night or during cloudy days. This setup provides complete control over your power supply and total energy independence. Off-grid systems eliminate monthly electricity bills and are ideal for remote locations or areas with unreliable grid access.
Basic Components of a DIY Solar Panel Setup
Every solar energy system, whether on-grid or off-grid, includes a few key components. Understanding what each part does will make your installation process smoother and safer:
1. Solar Panels: Are responsible for converting sunlight into direct current (DC) electricity. Panels vary in efficiency, wattage, and size. The most common types are monocrystalline, polycrystalline, and thin-film panels. For home installations, monocrystalline panels are generally the most efficient and space-saving choice. Choose panels with a combined wattage that matches your energy needs.
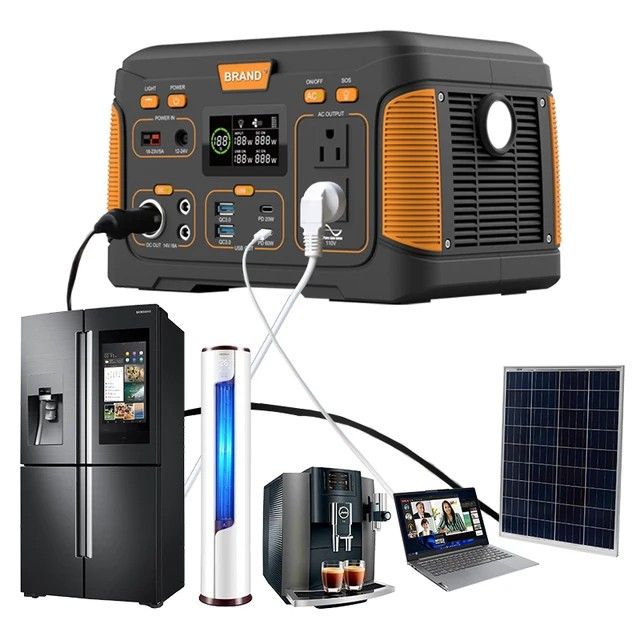
2. Inverter: The inverter converts the DC (direct current) electricity produced by your solar panels, which flows in one direction, into AC (alternating current) electricity, the kind that moves back and forth and is what powers your home appliances.
3. Battery Storage (For Off-Grid Systems): Batteries store excess power for use at night or on cloudy days. Common types include lead-acid, lithium-ion, and gel batteries. Choose batteries that can store enough energy to power your essential appliances for at least 24 hours without sunlight.
4. Charge Controller (For Off-Grid Systems): A charge controller manages the flow of power from your solar panels to the batteries, preventing overcharging or excessive discharge that could damage them. For best results, especially in areas with inconsistent sunlight, use an MPPT (Maximum Power Point Tracking) controller, which ensures higher efficiency and better performance.
5. Mounting Brackets and Hardware: These secure the panels to your roof or ground mount. The angle and orientation of your panels are crucial for maximizing sunlight exposure.
6. Cables, Connectors, and Safety Devices: Use cables rated for outdoor use and the correct amperage to handle your system’s power. Safety devices such as DC isolator switches, grounding wires, fuses, and breakers help protect your solar system and home from electrical hazards.
Essential Tools You’ll Need For Installation
Before you begin, ensure your toolbox is equipped with these key tools:
- Screwdrivers (flathead and Phillips): For securing screws in panels, brackets, and electrical components.
- Pliers (standard and needle-nose): For gripping, bending, and cutting wires.
- Wire strippers: To safely remove insulation from electrical wires.
- Utility knife: For cutting cables, insulation, or packaging.
- Drill and drill bits: To create holes for mounting brackets and securing hardware.
- Adjustable wrench: For tightening nuts and bolts on mounts and hardware.
- Hammer: For securing nails or adjusting hardware as needed.
- Measuring tape: To ensure proper spacing and alignment of panels and mounts.
- Level: To make sure panels are installed flat and at the correct tilt angle for maximum sun exposure.
Step-by-Step DIY Solar Installation Process
Installing solar panels takes preparation and care. Always read your kit’s instructions and prioritize safety, especially when working with electricity or on the roof:
Step 1: Prepare the Area
Pick a sunny spot that gets at least six hours of sunlight daily. Clear debris, trim branches, and ensure the roof or ground structure is stable and strong enough for the panels.
Step 2: Install Mounting Racks
Secure the brackets and rails using weatherproof hardware. Ensure roof penetrations are sealed to prevent leaks, and adjust the tilt angle for optimal sunlight.
Step 3: Mount the Panels
Attach the panels to the rails, ensure that they are secure and correctly oriented for maximum sun exposure.
Step 4: Connect Panels to the Inverter
Use solar-rated cables and connectors to link panels to the inverter. Follow the solar kit to connect all panels to the inverter correctly, and confirm that the positive and negative terminals match. This ensures the system works safely and prevents damage to your solar equipment.
Step 5: Battery and Charge Controller (Off-Grid Systems)
Place batteries in a well-ventilated area away from sunlight or moisture. Connect the charge controller between the panels and batteries to regulate power flow and prevent overcharging. To prevent voltage surges, always connect the batteries before attaching the solar panels.
Step 6: Grid Connection (On-Grid Systems)
For on-grid setups, a licensed electrician must connect your inverter to the home’s breaker panel and the utility grid. Permits and utility approval are required.
Step 7: Test the Solar System
Switch on the inverter first and verify that all parts are functioning properly. Observe the solar system for a few days to ensure it operates safely and efficiently.
Maintenance and Monitoring
Once your system is running, proper maintenance ensures consistent performance and longevity:
1. Clean Panels Regularly: Dirt and dust can reduce efficiency. Clean panels with a soft cloth and mild detergent every few months.
2. Inspect Wiring and Connections: Check for loose connections, corrosion, or damaged cables. Tighten and replace as needed.
3. Monitor Performance: Use the inverter’s monitoring display or a mobile app to track energy production and battery charge levels.
4. Battery Care: For off-grid systems, keep batteries charged and periodically check electrolyte levels (for lead-acid types). Replace aging batteries as needed.
Conclusion
Installing solar panels at home is a manageable project for many homeowners with the right guidance and tools. With proper planning and the right equipment, you can reduce your energy bills and take control of your electricity, whether you opt for an on-grid or off-grid system.