


Building your own DIY home bar is a convenient approach to enhancing the aesthetics of your room while avoiding the high costs associated with tailor-made furniture. The home bar can be utilized for many different purposes, such as a drink station, coffee station, tea station, and extra counter space when you have visitors. One good thing about building this DIY project is that it is highly customizable in terms of its dimensions, colors, and designs to fit into your interior decor.
Tools/materials needed to construct a basic home bar setup
The required materials/tools include:
- 2×4 timber for the frame structure
- 1×2 timber for the support of shelves
- 18 mm (¾ inch) plywood for constructing shelves and the exterior sides
- Corner molding
- Cordless drill machine
- 2½ inches long wood screws, along with matching drill bits
- Brad nail gun, along with nails or a hammer with finishing nails
- Wood glue
- Wood filler
- Pre-stain wood conditioning agent
- Your choice of wood stain color
- Polyurethane finish
- Foam brush
- level
How to construct a basic home bar
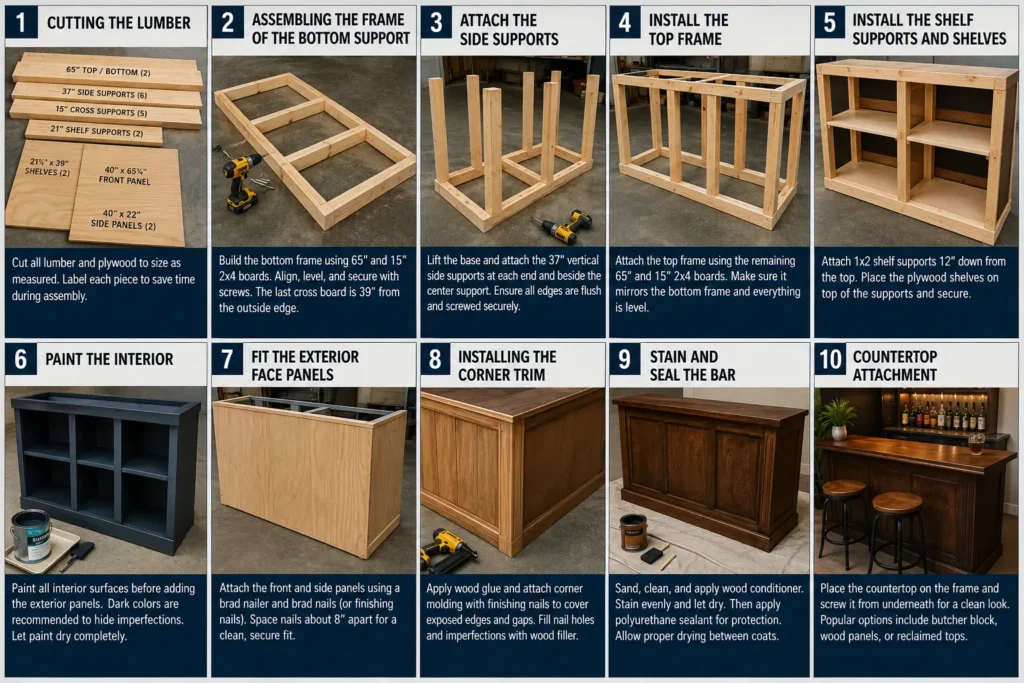
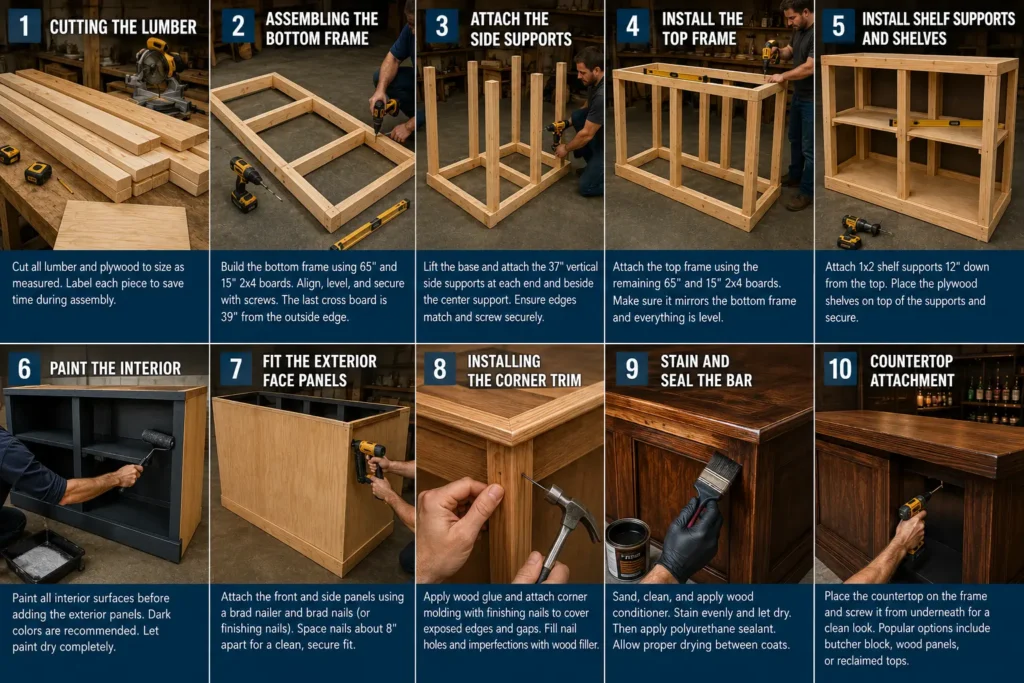
1. Cutting the lumber
Exact measurements are important to achieve a professional appearance. In case you don’t have a saw, most hardware stores can cut lumber for you when buying them. Prepare all measurements beforehand to ensure there are no problems when constructing the bar.
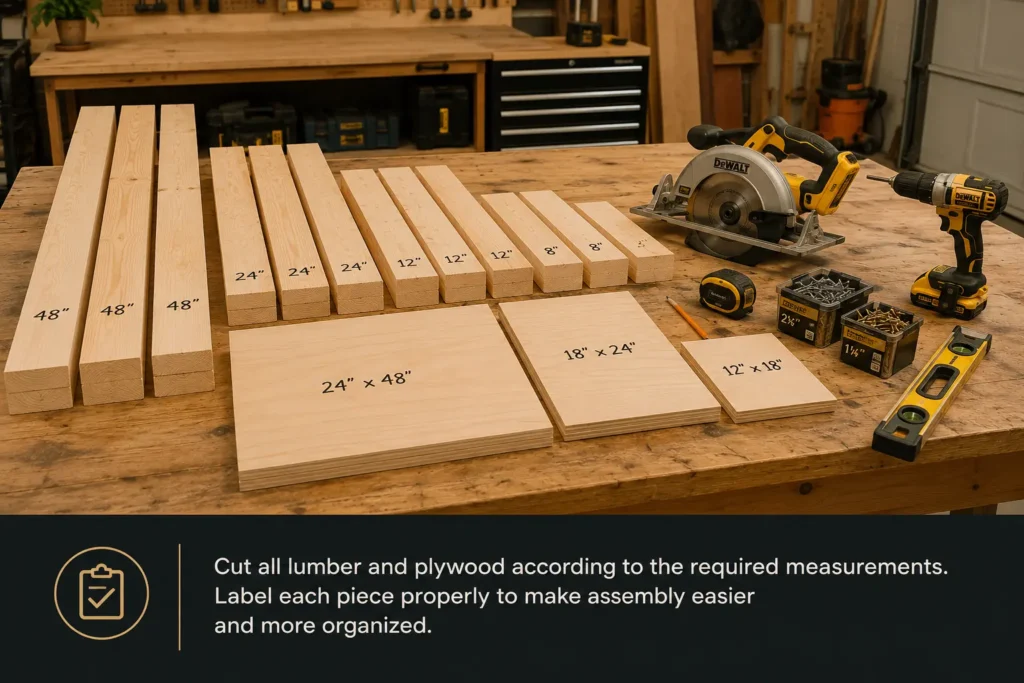
The measurements needed for building this home bar are:
- Height: 40 inches
- Length: 65 inches
- Width: 22 inches
- 2×4 Lumber Cuts
- Bottom frame bars – two pieces, measuring 65 inches each
- Top frame bars – two pieces, measuring 65 inches each
- Side frame bars – six pieces, measuring 37 inches each
- Cross-support bars – five pieces, measuring 15 inches each
- 1×2 lumber cuts
- Two shelf supports – 21 inches
- Corner molding pieces
- Two corner covers – 40 inches
- Plywood pieces
- Two inner shelves – 21½ x 39 inches
- Shelf support – 12 x 21 inches
- Front face panel – 40 x 65 ¾ inches
- Two side panels – 40 x 22 inches
Labeling all your cuts will save time when you start building.
2. Assembling the frame of the bottom support
Begin construction of the bottom frame by assembling the bottom part of the bar using 65-inch and 15-inch long 2×4 boards. Align the two longer boards parallel to each other and attach two additional support boards perpendicularly to them on each side of the board to create a rectangle. The last cross-board should be mounted 39 inches from the outside edge of the bottom part of the bar.
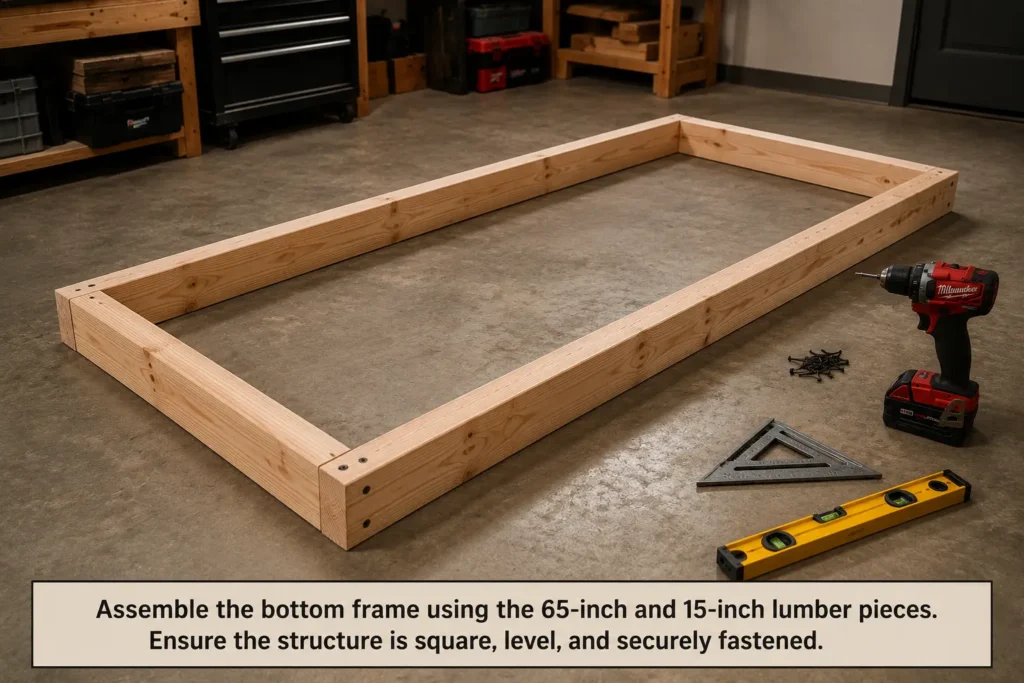
Make sure that all boards are straight and correctly positioned by aligning them before screwing them together using a level. Make sure to drill pilot holes prior to inserting screws into them. It is necessary to check that the frame is level all along the process because any deviations at this step might make your bar wobbly later on.
3. Attach the side supports
After the base frame has been assembled, lift it sideways to attach the vertical side supports. Make sure the side supports are placed in such a way that they form right angles to the bottom frame.
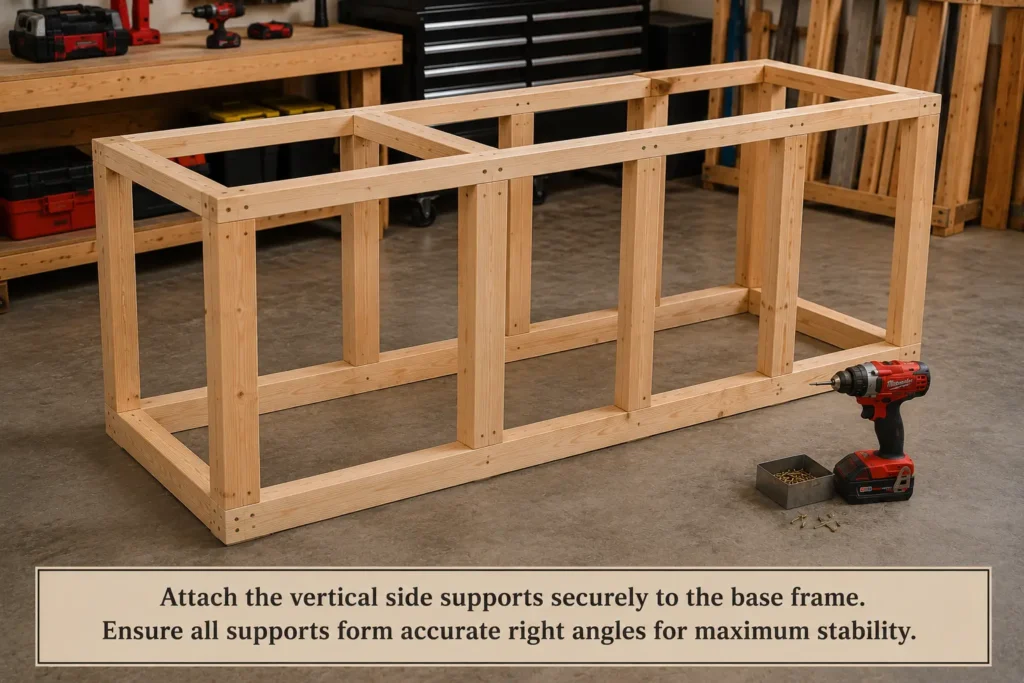
Two side supports should be attached at each end of the frame, and two more should be attached on either side of the center support. Make sure that the edges match properly before screwing them together.
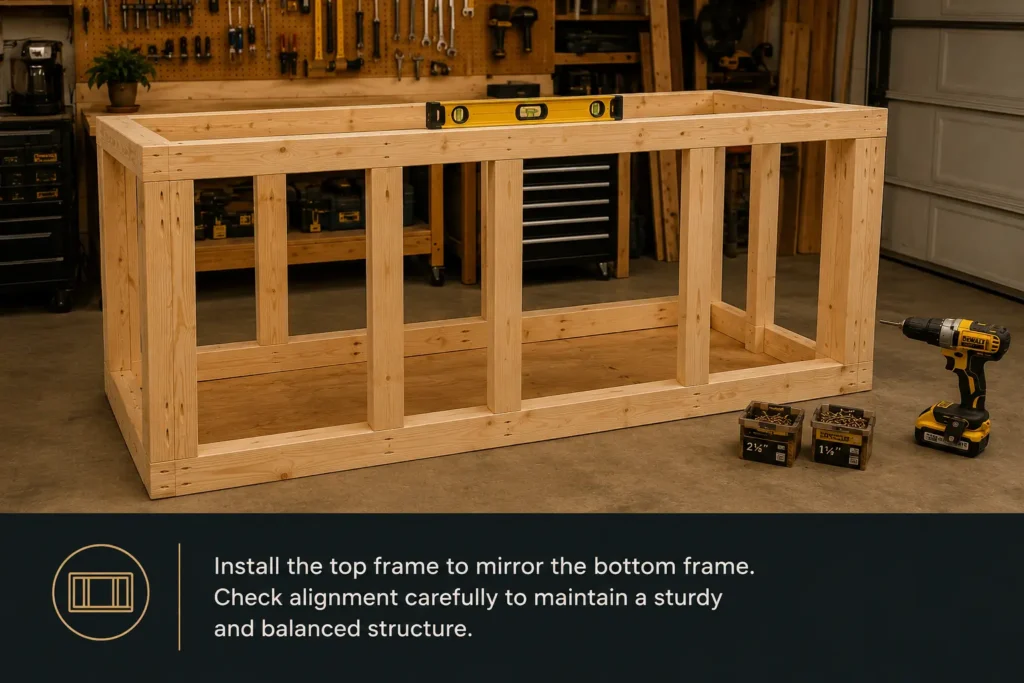
4. Install the top frame
Mount the other 65 inches and 15 inches of the 2x4s onto the top of the vertical supports in order to form the top frame. The top frame needs to be an exact replica of the bottom frame. After installation, you will have something that looks like a solid box structure that is essentially the framework for the homemade bar. Level everything out once again before proceeding to the next step.
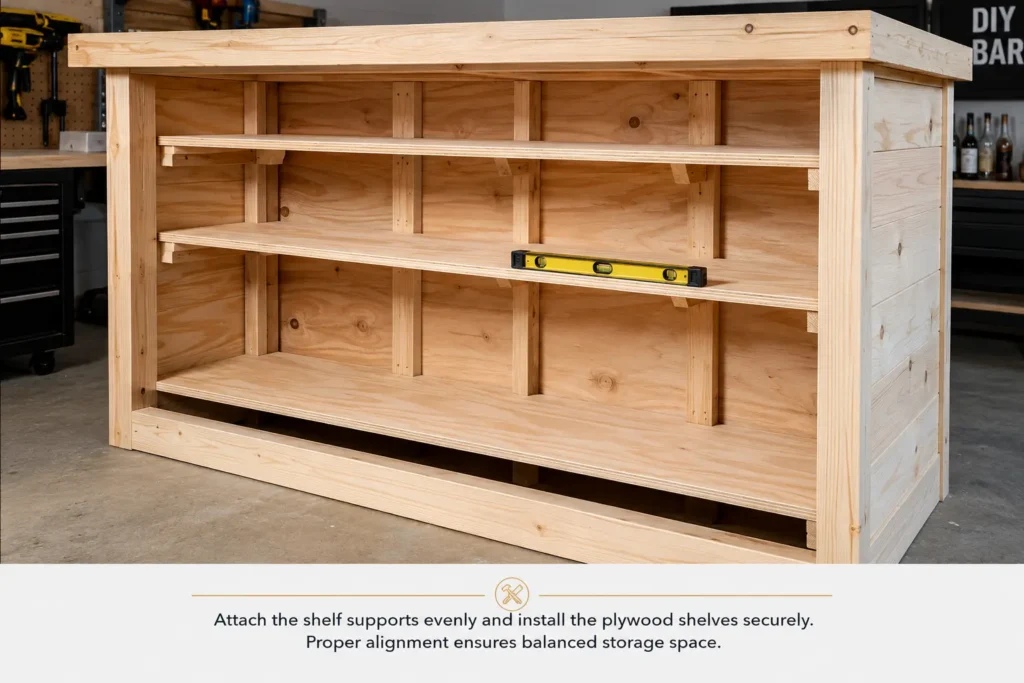
5. Install the shelf supports and shelves
Attach the 1×2 shelf supports to the side and middle supports. Ensure that the top edge of the supports is 12 inches from the top of the frame. A level can be used to ensure the shelf supports are properly aligned before permanently fixing them.
6. Paint the interior
Before mounting the exterior panels, paint the interior shelves and structure while everything is still conveniently accessible. It will make painting more convenient and ensure a higher quality result without having to strain yourself during later steps.

Select an interior paint color that matches the finished exterior color. The dark color choice is recommended for interiors as it is easier to blend with stained wood and hide any blemishes. Ensure the paint is fully dry before continuing.
7. Fit the exterior face panels
The exterior face panels need to be attached after the frame, shelves, and brackets are finished and painted. The front and side panels can be attached by using a brad nailer and brad nails. Alternatively, if you lack a brad nailer, you can use a hammer and finish nails.
In case one side of the bar comes into direct contact with the wall, you should just attach the front and sides because that will make things more practical without affecting your final product.
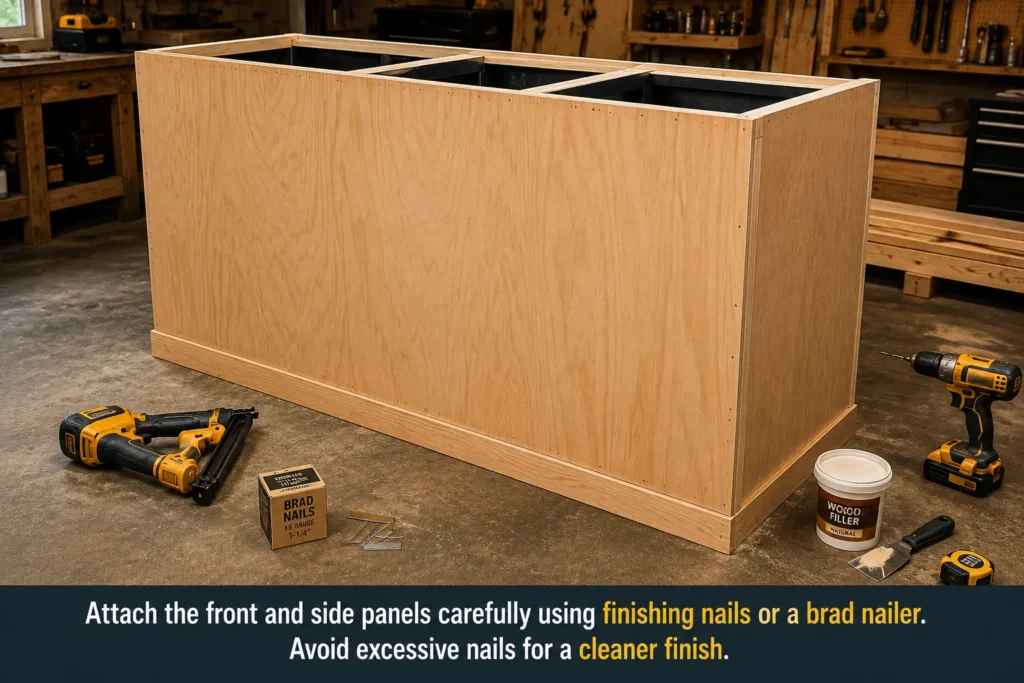
In attaching the panels, you should use enough nails to hold them down without being too much. Overusing nails results in numerous nail holes, which then need to be covered by wood filler, which is prone to absorbing the stains differently from wood. As such, eight inches apart should be enough.
8. Installing the corner trim
Adding corner trim is essential in enhancing the aesthetic appeal of the bar by covering any exposed edges on the panels and hiding any minor gaps that may occur around the corners.
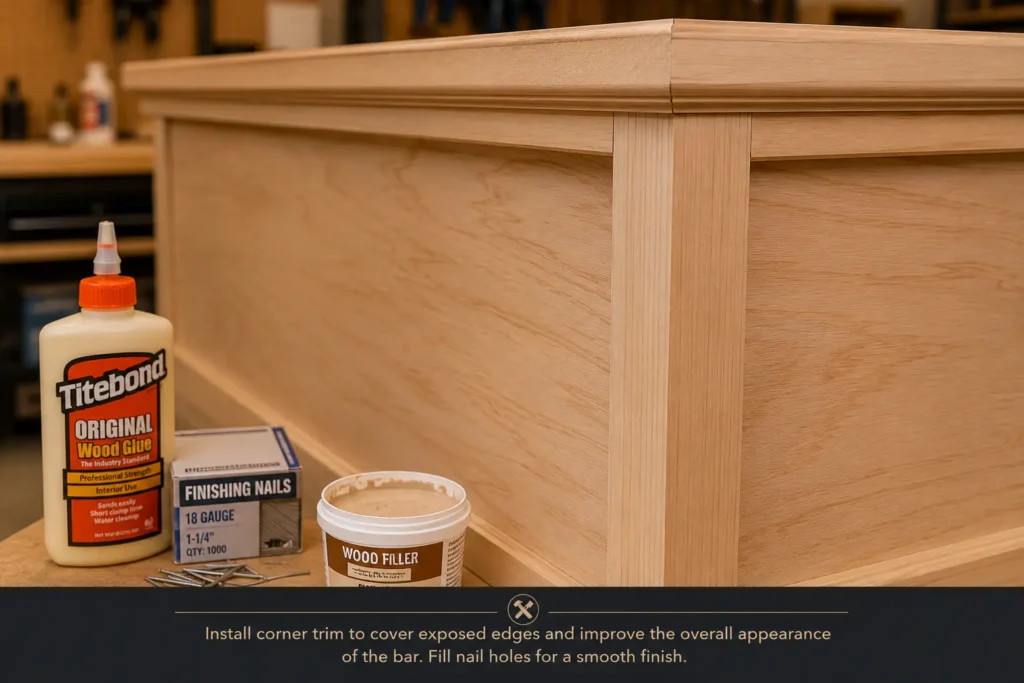
Wood glue should be applied around the edges of the panels, after which the trim can be secured in place using finishing nails. It is important that the corner trim covers every corner of the bar in its entirety. All nail holes and other minor defects should then be filled with wood filler.
9. Stain and seal the bar
Finishing will improve the overall look and longevity of the wood surface. First, you need to sand all plywood and trim surfaces along the grain of the wood for an even, smooth finish. Clear off all the dirt with a piece of cloth or tack cloth before you proceed to use finishing materials.
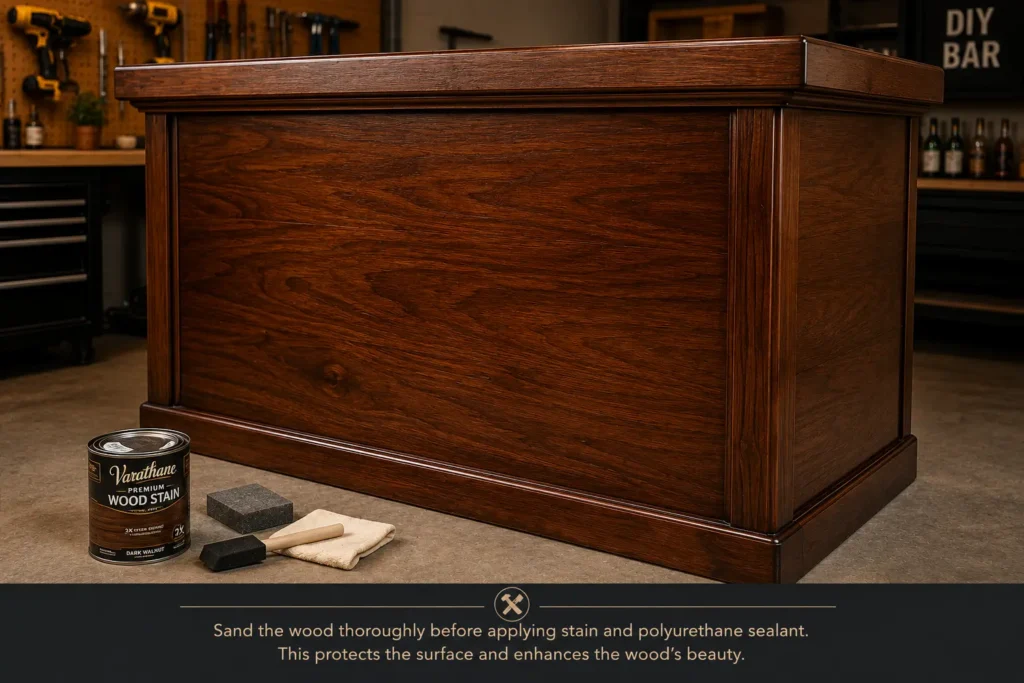
Next, apply wood conditioner to ensure even stain absorption on the wood surface. Once the conditioner is dry, apply your desired wood stain evenly with a foam brush or a piece of cloth. Once the wood has dried completely, coat the wood surface with polyurethane sealant to protect it against scratches and moisture.
This will not only add strength to the wood surface but also enhance its aesthetic beauty. Give enough drying time between coatings.
10. Countertop attachment
The last thing to do is attach the countertop. Simply place the countertop on the frame and screw it up from underneath the frame and into the counter. Attaching the screws from underneath will ensure a smooth and clean look without any hardware.
Some options for countertop materials that would be perfect for building a home bar include:
- Formica countertops
- Butcher block tops
- Wood panels
- Reclaimed doors/tabletops
- Used counters
A counter measuring 26 × 67 inches fits perfectly with the measurements in this example; however, depending on how much space you have, you could modify the dimensions as you see fit.
Conclusion
Now that you have installed the countertop, your DIY home bar project is done. You can customize your home bar according to your taste with bar stools, shelving units, lights, wine glass storage, and any other decorative items you want. See other DIY projects.
Sources